Showing posts with label winter coat. Show all posts

Thursday, 2 December 2010

Winter Coat - Progress Report Week 3

So after the relative success of the bound button holes (progress report 2) it was on to interfacing.
The pattern just called for the facings to be interfaced but following the 'couture' methods described in the Clare Schaeffer book and the Vogue book called for significantly more.

Now, my run ins with interfacing to date have been solely of the fusible variety. Cut it out, put it on reverse of fabric and hold hot iron on it for a few seconds. Job done. The Winter Coat though I decided deserved something better so 3 metres of tailoring canvas hair interfacing was acquired and I set to work. (I should probably confess at this stage to ordering the canvas hair online from here - not that there is anything wrong with ordering from Rascol - in fact I use them a lot as our house is not very conveniently positioned for fabric or haberdashery shopping - but mainly because I really didn't know what canvas hair looked or felt like and I knew that if I tried to go and buy it somewhere I would be presented with a range of options and made to choose which I needed which is not easy when you don't know!)

Reports vary as to where you should interface (all or just part of your front and back sections) but as the fabric that I am using is quite supple I decided that I would completely interface the front sections and that I would sew a back stay onto the back section (see below for further details on the back stay). My reasoning behind this was that the front sections get more wear and tear than the back and the "look" I am going for on the front of the coat is a slightly more stiffer look than is currently the case with the drape of the fabric.

Despite extensive research in my books and on the internet I struggled to find anything that particularly dealt with interfacing a coat with an extended front facing (You can see from the photo below that the pattern I am using has the facing section attached to the front section and it will then just fold back rather than a separate facing which you would then sew to the front section of the coat - does that make sense?).

Extended facing on front section of coat
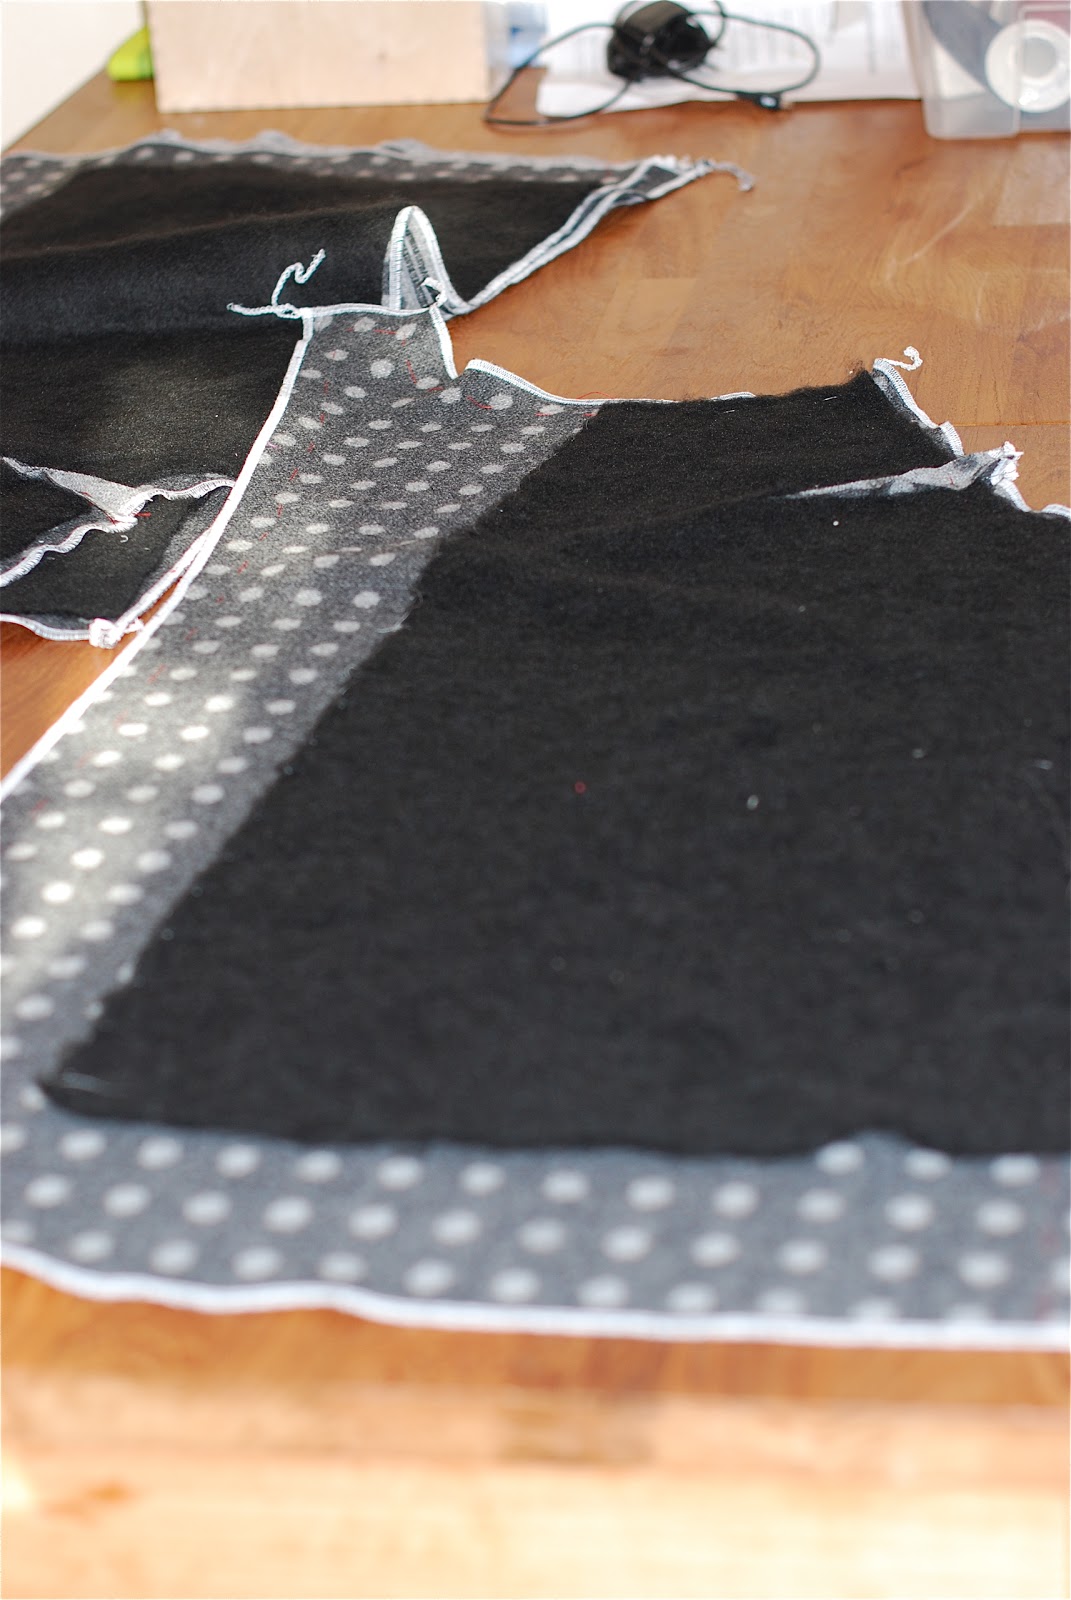
There are lots of articles and tutorials dealing with jackets and coats with lapels and so in the end, as with the interlining (blogged about here) I had to come up with my own solution. Basically the interfacing should be cut out of the sale pattern pieces as the fabric and then they are basted together. I decided though to interface the front section of the coat as one section and then the facing section as a separate section so using two pieces of interfacing and leaving a gap where the facing will fold over so as not to add bulk there.

Interfacing front section and facing section separately
I cut off the hem allowance so as not to double up the canvas hair in the hem and then interfaced the hem section with a lighter fusible interfacing. In order to attach the canvas hair I drew chalk lines approximately 3 cm apart vertically and I diagonally basted it to the interlining. (Gertie basted her canvas hair with more straight lines and I doubt it really matters (please read that in hushed tones as I imagine it is not the sort of thing you should say when talking about "couture") - I just liked the diagram in the Vogue book showing the diagonal basting. The book also says that diagonal basting is the same as padstitching just on a bigger scale so I also thought it would be good practice!)

diagonal basting to attach interfacing

You don't need to baste into the seam allowances and I cut out the interfacing round the bust darts and pulled the fabric through so it could be catch-stitched to the interfacing

cut interfacing round dart and catch stitch fabric to interfacing
And, finally, in relation to interfacing the front sections I cut out holes in the interfacing behind the bound button holes.


Onto the back section.
As I said above I decided to apply a back stay to the back section. This effectively means interfacing the top part of the back section from the neckline to about 10 cm below the arm holes. I cut the interfacing out using the back pattern piece and then drew a curved line, going up slightly in the middle, from a point approximately 10cm below each arm hole to the other side.


For the back stay I followed Gertie's lead and machine sewed it to the fabric just within the seam allowance all the way round from one side, up the arm hole, across the neckline, down the other armhole and down the side.

Then, just when I thought I was done with the interfacing for the front and back sections I turned the page in the Vogue book and read about tailor padding. This is effectively an addition layer of interfacing with a layer of flannel below (sandwiched between the two layers of interfacing) that goes round the armhole sections as shown below to provide extra support in this area. The tailor padding should not extend into the seam allowances and is diagonally basted to the underlying layer of interfacing as before.


tailor padding on front section

tailor padding on back section
Finally, for the front and back sections I applied twill tape to the neck line and armholes and the fold line where the facing will fold over on the front sections. I catch stitched the tape by placing it just on the seam lines, in relation to the neck and armholes with the rest of the tape on the actual garment side of the seam line (rather than in the seam allowance), and by placing it just inside the fold line on the front section, rather than on the facing section. I also placed a line of twill tape on the edge of the facing section so that this section will not sag.


twill tape catch-stitched

twill tape applied round neckline and arm holes

twill tape on fold line and outer edge of front facing
Next I am interfacing the sleeves and then it is the moment of truth as I can finally start to sew the pieces together and see if they look like an actual coat!


I realise that I am running almost a week behind with my weekly progress reports but hopefully that will be rectified this weekend by me posting the next instalment - stay tuned - oh and don't forget to have a look at my advent calendar!! 

Tuesday, 23 November 2010

Winter Coat - Progress Report Week 2

As you may have seen if you stopped by recently I have spent a large part of my sewing time last week working on Christmas presents so I haven't progressed enormously on the winter coat but I did baste it roughly together to check that I liked the buttons and to work out where I wanted them to go. I'm not going to show you a photo of that as, truthfully, I forgot to take one....but it did mean I could start on the bound button holes.

But, before you get excited and tricked into thinking that you are shortly to see my bound buttonhole effort I thought I would expand a little on the interlining. You may remember that I wanted to interline my coat for added warmth and cosiness and that last week I had basted the interlining to the coat fabric.

I added that as a somewhat cool throw away comment in the last progress report but thought  I should actually fill you in on a fairly banal step in my coat making but which actually caused me the most angst so far. You see my main problem was that once I had decided to interline my coat I looked up in the Vogue book and in Claire Schaeffer's book what I was to do with it. Claire Schaeffer was the least help - it not featuring at all (but then her book, in fairness, doesn't really deal with coats). Vogue stipulated that the interlining should be cut out with the lining and basted to the lining pieces. I should probably have stopped there and followed their advice but I was worried that this would add weight to the lining and make it sag and I thought I would just check what other on-line sources had to add.

At this point I came across this article  and also this article both of which were firm proponents of basting the interlining to the fashion fabric (in other words your outer coat fabric) and then continuing as if they were one.

After much debating (with myself) I decided to go with the Threads advice - and I basted the interlining to the fashion fabric - in the same way as if it were an underlining (which, if you are as ignorant about these things as I was until last week, is an extra layer that you add between the fashion fabric and the lining to add stability, structure and to deal with any transparency issues - and you cut it out of the same pieces as the outer garment and baste it to the fashion fabric and then continue as if they were one).

I couldn't find anywhere particularly helpful in terms of exactly how to baste the interlining to the fabric so took the techniques in the Vogue book described for underlining and adapted them as I thought fit (yes, in other words I went out on my own here!).

Firstly I cut the interlining from the same pieces as the main coat pieces, but not the facings and then laid them on the fabric and cut away the hem allowance as I don't need interlining doubled up in the hem. I then basted round with a running stitch in the seam allowances to keep it in place. Once the seams are sewn I will cut it away in the seam allowances so that there is not too much bulk. Along the edges where there isn't a seam allowance I used a herringbone stitch to catch it to the fabric.

interlining on fabric with facing and hem allowance cut away


interlining basted onto my fabric - using the herringbone stitch


I also cut away the interlining around the darts and cut the darts open so that they lie flat, as shown below.


interlining cut round darts


So there you have the synopsis of the interlining dilemma. Next up was the bound button holes.

Before ploughing straight in on my actual coat I thought I should try some out on scraps of fabric. I read up in Claire Schaeffer's book and the Vogue book and also looked at Gertie's tutorial for bound button holes. All of them recommend using silk organza in the process which was my hurdle number 1. No silk organza. I did a couple of practice ones with some synthetic organza but, as Kenneth Cole says in one of his articles in Threads - synthetic organza has too much 'sproing' so I decided that I should wait until I could get some silk organza to do the button holes on my actual coat.

It is recommended that you get the organza in a colour close to your fashion fabric. Unfortunately that wasn't possible for me unless I wanted to wait for shipping from a distant country so I went ahead with some ecru coloured organza that I got at an extortionate price in a very lovely but very expensive shop in Carpentras.

Another benefit of doing the practice run button holes (aside from agreeing that synthetic organza has too much sproing) was that I could see whether the interlining that I had already basted to the fashion fabric was going to give me head aches. And, guess what?? yes, I ended up undoing the basting and folding back the interlining so that I could do the bound button holes without including the interlining...one step forward, two steps back!

Anyway, that done it was time to tackle the button holes. I have a thing about button holes. I don't like them. And I'm not just talking about the bound ones. No matter how many practice ones I do I never feel entirely comfortable going into the process on my actual garment. This uneasiness stayed with me throughout the whole process of making the bound button holes (which is significantly longer than just sticking the fabric under your buttonhole foot on the machine and whizzing through the four steps) but I have to say all in all it was not quite as bad as I expected.

Gertie has an excellent tutorial which describes (and shows with photos) each step of the process. I was so intent on getting them done that I didn't take many photos as I was doing them but those that I have shared below give you a rough idea of the steps involved.

marking the lines on the reverse of the fabric - after attaching fusible interfacing


the four button holes marked

The next step was to pin a square of silk organza to the front of the fabric and stitch round the square which you then cut into diagonally into each corner and you then push the organza through to the back of the fabric


the four button holes seen from the reverse side of the fabric after pushing through the organza

the view from the front of the fabric
 The strips are then attached to the back and voilà!

bound buttonholes!
 I tried to match the pattern of the fabric on the strips so that it didn't look too odd. They are by no means perfect but I don't think they are disastrous either.

close up of the buttonhole


Next I am permanently basting in the interfacing to the front sections of the coat and applying a back stay to the back sections. I am also debating adding some interfacing to the underarm sections of the sleeves. More on that next time!

Saturday, 13 November 2010

The Winter Coat Progress Report - week 1

The last time I about 'the winter coat' was here. At that point I was still at the inspiration seeking stage but the more I looked at coats (you wouldn't believe how obsessed you can become about coat shapes, lengths, collar shapes and sizes etc) the more I decided that I wanted to go for something resembling this lovely creation by Kate Spade.


Untitled
Coat and sunglasses by Kate Spade, bag by Prada (surely once the coat is made I will need at least the glasses...)


Once I had made that decision I started the hunt for a pattern. I knew that if I wanted something similar to the collar detail on the Kate Spade coat I would probably have to draft the pattern myself and for the rest I finally decided on a Burda style pattern from the March 2010 magazine. You can see the pattern here. It obviously needed some modification but it does at least give me the basic shape.

Now, if you have had a look at my blog before you will have realised that most of the projects I undertake are fairly quick - a limited amount of sewing time and a propensity to like to 'get things done' mean that most things I do are finished within a couple of days. This has advantages in that I do 'get things done' but the disadvantage is that it does limit the type of projects I do and therefore limits my skills as a seamstress.

I have therefore decided that 'the winter coat' is a perfect opportunity to change all of this. Rather than just jumping in I have actually read up on tailoring and set out a series of steps for myself, determined as I am that this should be a project that is done properly.

For my research I used Vogue Sewing (revised and updated by sixth&springbooks) and Couture Sewing Techniques by Claire Shaeffer. I have also followed the excellent Lady Grey sew-along on Gertie's blog.


The steps I have determined should be done, and in this order, are

  • make a muslin
  • transfer any changes to muslin to paper pattern
  • cut out fabric and thread baste all markings and stitching lines
  • overlock seam allowances
  • cut out and baste interlining (more on this further down)
  • bound button holes
  • interface (including some padstitching) coat front
  • make and attach pockets (if decide I want them - see further down)
  • assemble coat body
  • apply back stay
  • set in sleeves
  • interface collar
  • assemble lining and attach to coat together with facings and collar
  • finish button holes on facings
  • hem, attach buttons and go forth in beautiful coat
Phew! Now I am feeling completely overwhelmed. Somehow putting the steps in type print rather than having them scrawled on a scrappy but of paper makes them seem much more serious.

Anyway, enough with being overwhelmed and on with the task.

the muslin


I haven't got much to say about the muslin. Fitting was not really the issue - I cut a size 38 and then widened the armholes slightly as the pattern was for a spring coat- hence no underlining and also I imagine not drafted to ensure thick woolly jumpers can be worn underneath. Other than that I made no other fitting changes. The changes I did make were to make the coat more like the Kate Spade inspiration  - I omitted the front welt pockets, shortened the sleeves, took off the collar and added a self drafted scarf like collar. I am, as yet, undecided as to whether or not I will add patch pockets. I have some drafted and will wait to see once the coat is basted together whether I like them or not. Similarly for the back belt.

The changes I made translated fairly easily to the paper pattern and then it was time to cut the fabric and thread baste all the markings and stitching lines. I have to say that thread basting stitching lines, especially late at night, is quite tedious and I would be sorely tempted to omit this bit if I had a pattern that included the seam allowances. (Burda style patterns do not include seam allowances).

After the thread basting overlocking the seam allowances was pure joy- I love my overlocker!!

I then cut out and basted the underlining to the fabric. The underlining adds a further layer of warmth to the coat and although my fabric is pure wool it is not massively thick. The underlining adds the 'cosy' touch! The underlining I bought has a fleecy felty kind of feel and, from my research, once it is basted to the fabric I treat it and the fabric as one.

And so now I am up to the bound button holes.

I blogged a couple of days ago about the first lot of buttons I bought but yesterday I found these

new bigger, darker buttons


Despite everything I said earlier I am actually going to go slightly out of step next and baste together the coat as I want to baste on the buttons to check where I want them to go and also to double check that these are the right ones. I am also going to be practising making bound button holes (what a life!!).

I will leave you with a view of my supplies


clockwise from left:shoulder pads, fusible interfacing, tailoring interfacing, underlining, lining, twill tape for roll line, thread, buttons and silk thread for pad stitching


Thursday, 11 November 2010

Christmas Countdown

It happens every year. At the end of the summer school starts and I begin to plan Christmas presents. I write lists, I shop around for supplies, I search for ideas and then write more lists (often in different coloured pens to show how organised and efficient I am - yes I always did revision timetables in different coloured pens too!).

Then suddenly it is mid-November and I have lots of lovely looking lists but no actual presents ready to give. Ok so it is only mid-November, there are still 5 weeks left (ok, 6 until Christmas but I can't count the last week as 5 weeks this weekend I will be on a plane with three very excited little people and a big suitcase full of lovely home made presents) but to ensure peace and tranquility in my mind I think I need to get on with making some of the presents. I am currently cutting out like a mad woman...


 and next week I will be sewing like a demon. I will then be able to approach Christmas with the serenity expected of a person who write colour coded lists.

I am also slowly working on my winter coat. I will do a full progress report tomorrow but in the meantime have a look at these buttons...


What do you think? I am not sure. I went to two shops the other day and these were the best on offer. Should I keep on searching?

Monday, 8 November 2010

Dotty Patterned Jersey Dress


As I hinted the other day, I have a new toy. One of the parcels waiting to be collected on my return from holidays was this:


I've hankered after an overlocker for a while now but doing the Hong Kong finishes on my red and white dress confirmed my 'need' (quite different to a 'want' you understand). I mean I can't be spending hours finishing seams if I am to get everything on my to-do list sewed up can I?

And, a further bonus, (as well as having gorgeously professional looking finished seams) is that the world of jersey and knit is now mine. 

Time to reveal parcel number two


Several bloggers have already extolled the virtues of this book. It basically contains three basic patterns for jersey - 


a crew-neck t-shirt

a raglan sweatshirt
and a jersey dress
along with 6 or 7 ways to vary each pattern to give you a variation on the theme. In addition, it has very complete instructions on how to sew up the garments and good tips on using an overlocker (which I found extremely useful as the instructions that came with the machine were good in that I managed to thread it and get it working but knowing how to use it properly is another thing altogether - and in some ways quite different to a sewing machine - this is undoubtedly not news to many of you but may be useful to someone who has never used an overlocker before).

Anyway, having spent a little time getting acquainted with the machine - the results of which you can see here, I decided it was time to make up a proper garment (rather than a winged home-made pattern item).  I was tempted to make up the t-shirt first but the only jersey fabric I had in my stash was this


which I felt lent itself rather more to a dress. So the dress it was. I went with the basic pattern as drafted without any modifications partly because the aim of this project was to see how I got on sewing almost entirely on the overlocker rather than  testing my pattern modification skills, but also because, actually, the basic dress pattern was the one that I felt suited this fabric the best.

The dress is made up of a bodice section, a waistband and a skirt section. It has gathered sleeves and, being jersey, no need for closures or darts. I put it together entirely on the overlocker and used my sewing machine only to topstitch down the neckline (after it had been overlocked) and for the hem.

top stitched neckline - and you can see the overlocked edge that has been topstitched down in the background

Overall I am pretty happy. I love the gathered sleeves and I will probably use the bodice section (lengthened) and sleeves pattern pieces to make some tops. This pattern also lends itself to using different coloured fabric for the skirt and/or waistband sections.

And the real bonus? This whole project, from getting the fabric out of the cupboard to doing the final - 'aren't I clever' mirror pose - took slightly less than 2 hours. What is not to like?


gathered sleeves


I will leave you with a photo of my overlocker in action, which also gives you a peep at the fabric for my winter coat....